Thursday, March 5, 2020

VIC Gaming Club Flyer (Oculus Quest)


    This is a flyer I created for the gaming club that I currently manage at work. It is a quick Photoshop collage I threw together featuring some of  the games available for my fellow employees to experience on the Oculus Quest. This image gets emailed to club members along with a time and date of the next club meeting. 

    The second image shows the 6 main images I used to create this collage in Photoshop. Considering how little time I had to work on this, I am happy with the final results.


Friday, January 2, 2015

Ray Applique (Self Portrait)


     This is a self portrait that was inspired by The Victor Project. I was working for a sportswear apparel company and I began (with permission) doing a handful of art projects in applique after hours. I originally envisioned this project as being a culmination of all the techniques I was using to design with at the time. I wanted there to be embroidery, applique, screen print, laser etching, and maybe even 3D puff. Unfortunately, the company came on hard times and went out of business. Needless to say I lost access to all the equipment I had become an expert in, and I wasn't able to finish my self portrait showcasing my abilities.
  
    For the new year I decided to do a self portrait, and I wanted to revisit the project I was never able to finish. I had the original mock-up in illustrator, as well as the first test sew out. I had no choice but to simplify my original vision (which was probably for the better), and decided to stick with applique being the primary technique.
 
    
     The image above is the initial Illustrator mock-up that was used to create the appliques. This stage was basically just trying to get shapes accurate with a composition I liked. The colors did not matter to me. It was also designed to scale so that there would be no issues with the various limitations that come with embroidery and applique. Due to these limitations I was always going to have to sew it in sections, and later put it together in Photoshop. The actual size of the head is 9.5 inches tall.

 
     The picture on the left is a screen grab of the Illustrator file imported into the embroidery software, Tajima Pulse. The picture on the right was my first (and only) test sew out. It is 5 layers of applique. This is where this project initially came to an end when the company went out of business. It was also my starting point for the final version at the beginning of this post.
 
     As you can see a lot of work went into this project. I had to fake a lot of the techniques with varying degrees of success. I'm happy with the way the final version ended up. My only regret is that I wish I would have found a way to sew out the eyes for real, instead of settling for the digital version.

Tuesday, December 30, 2014

The Victor Project (Darkstalkers)

     A few years ago Udon Entertainment created a contest for the Darkstalkers fighting game where fans could submit original art with the hopes of it getting published in the tribute book. I was working at a sportswear apparel company at the time, and I had the idea to create an applique portrait of the Victor von Gerdenheim character. Victor is sort of a blue version of the classic Frankenstein character in the Darkstalkers universe, and I thought creating him out of applique would uniquely illustrate how the character is literally stitched together.

 
    I was not aware of this contest until late in the process, but I liked my idea so I moved forward with it. Time was an issue because I had less than 2 weeks to create a composition, set it up to embroider with the laser applique machine, and then piece it all together in Photoshop. Victor is ultimately made up of 4 different sew outs that were combined in Photoshop (5 sew outs if you include the bolts that I ultimately removed from the final version because they looked terrible).
 
     While I barely submitted under the deadline, the original version suffered due to how quickly it was put together. I was not surprised when my piece was not accepted. I revisited this project shortly after it was rejected and reworked it into something I could look at. Currently Udon is having a similar contest and I may revisit The Victor Project again. I'm hopeful that I can create a more compelling piece that has a chance of being accepted into the new tribute book.
 
    I did similar personal projects up until the sportswear company went out of business. My final project was a self portrait that was inspired by The Victor Project. Sadly, I never finished it because the company closed it doors before I could sew everything out. Recently, I decided to complete that self portrait and "fake" a lot of the embroidery and appliques that were never sewn. It's nearing completion so I thought it would be nice to post the project that inspired it.
 

Monday, December 15, 2014

Proto Man Costume Halloween 2014 (Protoman)

     Above are a few pictures of my finished Proto Man costume (yes, I am missing the shield). This costume turned into a bigger project than I anticipated, and time became an issue leading up to Halloween. With that being said, I'm still happy with how this costume turned out. I'll probably wear this costume again at Comic Con, and at that time I'll complete the shield, and make other improvements.
 
     I found this dirt bike helmet at a thrift store for $4. Originally I was looking for something that I could make into a Mega Man helmet. However, once I saw the red helmet Proto Man seemed like a much cooler option.
 
     I removed the visor and created the white shape of Proto Man's helmet with masking tape. This allowed me to get the shape to look correct. I then removed the masking taped and used it as a template to trace the shape onto a thin sheet of plastic.
 
     Above is the white plastic element added to the helmet. I painted it white and pop-riveted it into place. Getting it straight and symmetrical without it binding took patience and time. I also used a Dremel cutting wheel to remove the mouth area of the helmet.
  
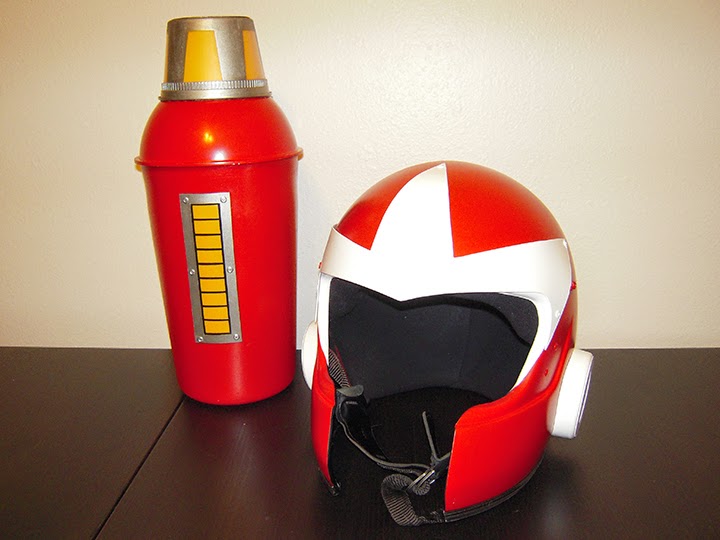
    The completed Proto Man helmet. The white circle "ears" were perhaps the most difficult part of the entire helmet. They are made from cupcake sprinkle containers from Target. Getting them to rest flush against the curve of the helmet was a long process of trial and error. After multiple tries I finally made a perfect one. I then had to mirror the shape for the opposite side. To complete the helmet I wear black safety sunglasses.
 
     These Rubbermaid 1 gallon pitchers would ultimately make up my cannon and armor for my forearms. I removed the handle and spout with a grinder and drilled a hole in the bottom using a hole saw bit. This plastic was not meant to be destroyed like this. It was another frustrating, and time consuming project.
 
     I used various plastic dollar store bowls to complete the shapes for Proto Man's arms.  I had to shorten the non-cannon forearm by a couple of inches so I could fully bend my elbow. I used a clear plastic container for the tip of the cannon. There is actually a flash light in the tip that lights the cannon up. The power bar on the cannon was made with the same thin plastic that was used on the helmet. It was also pop-riveted onto the cannon after some paint. The power bar also lights up.
 
Above are a couple pictures of the finished cannon. There is a handle inside the cannon (not pictured) that helps me hold the cannon into place. I'm really happy with how the cannon turned out.
 
    I struggled with how to build the boots for Proto Man and I was running out of time. This was ultimately my solution. I used the same thin sheet of plastic from before, and rolled it into a tube. I used brad fasteners to hold the shape. I then added some foam padding to snug them to my calves, and I slid cut-off sweat pant legs over them. Not what I was hoping for, but ultimately it worked for the costume party. I completed the boot by wearing red slippers. If I use this costume again I'll revisit Proto Man's boots and hopefully end up with a better, improved solution.

     A quick shot of my cannon lit up in the dark. The costume was a success! It turned into a much bigger project than I anticipated, but it was fun to work on. The helmet and cannon make a great display in my office/studio. I may wear this again at a Comic Con, but I need to make some improvements first and finish the shield.


Tuesday, September 9, 2014

Fantasy Football Avatar

     Football season is upon us which means it's time for a new avatar for my fantasy teams. I decided to use a picture of my Power Master Optimus Prime because I've always liked the head sculpt of this particular Transformer. I manipulated the colors in Photoshop and added a yellow background. The use of these primary colors really makes the image pop off the screen. I have a rectangle version for my ESPN league, and a square version for my local Pick-Em league.


Hopefully it will be another successful season for my "PonyBoys".

Tuesday, August 19, 2014

Final Blanka Fight Stick

     After a long hiatus I've returned to my blog. I figured I would pick up where I left off by showing the completed version of the custom Blanka Fight Stick I put together for my brother. As you can see I removed my original Blanka illustration, and replaced it with this incredible Blanka artwork I found online by an artist named Luc De Haan. Below is a link to his original artwork.

http://omuk.deviantart.com/art/Street-fighter-Blanka-332761959

     I used Luc De Haan's Blanka image and incorporated it into the background I had previously put together. I adjusted the colors of his Blanka artwork, and brightened up the image as well to help make the colors pop off the fight stick. Even though I normally do not like to butcher other people's art, I am very happy with the end result.


     Below are some pictures of the final fight stick. I had a hard time photographing this because of the reflections from the thin acrylic that protects the artwork.
 

     As you can see I added Blanka's original victory quote from Street Fighter II, as well as the Brazil flag. I'll dig up my finished original Blanka illustration that I replaced with Luc De Haan's work and attach it in a future post.

Tuesday, March 26, 2013

Custom Blanka Fight Stick

     I want to start this post by briefly stating that I'm not sure exactly what my goal for this blog is yet. For the time being I want to keep my personal and freelance projects separate, but in the future I see it being a combination of all my work. So far I've only posted "final versions" of projects, but for the next few post's I'm going to show my process. I spent this past week working on freelance, but now that I have some free time it's back to my own projects.  
     My brother's favorite Street Fighter character is Blanka, and he wants to customize his arcade fight stick for his Xbox. This seemed like a good opportunity for a fun project so I'm creating some custom artwork for his controller. I'm not sure if he'll end up using my art, but it gives me a fun project to work on. Plus it will be good practice for when I customize MY controller in the future.
 
 
     This is a cleaned up sketch I drew of Blanka.  It's actually a combination of different sketches pieced together. I'm out of practice so getting the pose, proportions, and line-work was difficult. I referenced some other Street Fighter art (in particular Zangief for some reason) to help me get things looking correct.

     I added some color to my sketch to help me figure out my composition moving forward. This is NOT the final version of Blanka. It's simply my starting point. 
 
     This is the basic template for the fight stick. It's a Mad Catz Tournament Edition layout that was originally released with Street Fighter IV. I found a graphic of Blanka's original stage from Street Fighter II, and used it for the background of this custom art with a monochromatic green effect. I also downloaded a fan-made Street Fighter IV font to label the buttons. The main texture behind Blanka's stage looks like a marble at first glance, but it's actually leaves.
 
     This is currently where I'm at in the process. I added my Blanka to the layout to see how things were looking. I also added some controller elements that I photographed. I changed the color of the buttons in Photoshop to match what the final colors will be. My next step is to focus on Blanka, and color him "for real". Then I need to figure out what other elements I want to add to the composition. Right now it's still needs something else.